Today I'm sharing my first tutorial!
I decided the other day that I needed a new wreath for my front door--I still had the red berry wreath up from Christmas, and although it is holiday neutral, I decided it was time for a change.
So this is what I came up with...a cheery, happy Spring Wreath!
Here is the list of materials you'll need to make this wreath:
- One wreath form--I chose a straw form at Hobby Lobby because it was cheaper, but you can use a foam form if you prefer
- Felt sheets in the colors of your choice--quantity will vary based on the size wreath form you use--my wreath is 14" diameter and I used 12 felt sheets total
- Hot glue gun and glue sticks
- Complementary shade of grosgrain ribbon for the hanger--I used 1/2 yard
- Three complementary shades of worsted weight yarn for the roses
- Size G crochet hook
- Yarn needle
- 6 extra long straight pins (optional)
- Pinking shears or other decorative edge scissors
Take your felt sheets and cut them in strips about 3 inches wide and long enough to wrap around the wreath form. Using the hot glue gun, shoot a strip of hot glue across one end of the strip and, pulling the other end tight, overlap and secure it in place.
You can choose any pattern you'd like--I used purple, pink, green, pink, green then started over.
Once you get it all covered, it'll look like this:
You can see at the bottom of this picture, the last purple strip is completely on top of the other strips. This is where I chose to place my crocheted flowers.
The tutorial I followed for the crochet roses was from the pompom Emporium and is very easy. However, you can use any flower pattern you like.
Note: If you use the pompom Emporium's pattern, leave a long tail on the beginning and end of your crochet--longer than the 10" she instructs. That way, you have plenty of yarn with which to tie your rose to your wreath.
I made three roses, but you can use however many flowers you want--it's all up to you how flowery your wreath will be! (I like things in threes and other odd numbers)
Once you've completed each rose, use the long tails you left on each end to tie them to the wreath form. Once you've knotted the ends, cut off any excess yarn. (sorry I didn't take a picture of this step!)
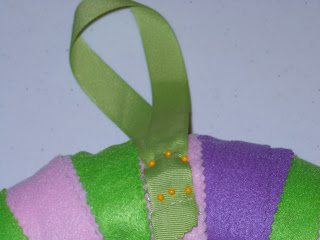
To make the hanger, lap the ends of your ribbon over each other (once again, I neglected to take a picture of this step) and sew across the width of the ribbon--either by hand or machine. Then, using your hot glue again, attach the hanger to the back of your wreath. I used six extra long straight pins to reinforce the hanger--you just pin them right through your big blob of hot glue.
Once the hot glue on the hanger has sufficiently cooled (about 5 minutes does the trick) you're ready to hang up your Spring Wreath!
 |
| Voila!! |
Easy peasy, right??
(Update as of 3-16-12--> now seen on That's the Ticket Blog Hop!! Check it out! 3-18-12 check out Rusty and Redone KISS party too!)
WIP update
So I finally finished the embroidery on the fish! Well--on the body of the fish anyway.
It took an entire skein of embroidery floss. So I'm off to the store today to buy another so I can complete the fins and tail. After that, all that will be left to embroider are the other two lily pads!
I'd love to hear from you, especially if you decide to make your own Spring Wreath--let me know how it turns out!


Love the crochet roses. And the scales on Koi!! Doing an awesome job Teri.
ReplyDeleteThanks! and thanks for leaving a comment! :) hehe :)
DeleteThanks for linking this up at the KISS party! Great tutorial & cute project!
ReplyDelete